|
Other aspects of the LOCKSHOP module are listed and linked
in the left hand column.
This section covers the CREATION, MODIFICATION, DESTROYING and REPORTING of
KeyRings.
INDEX
How KeyRings Work
Creating a KeyRing
Placing
the KeyRing at an Issue Point
Destroying a KeyRing
Marking a KeyRing as Lost
Marking a KeyRing as
Stolen
Re-Configuring or Modifying a KeyRing
KeyRing Report
KeyRing History
About KeyRings and their
use
How KeyRings Work
KeyRings are groups of keys.
Each ring is created, modified, and controlled by privileges granted by your
Systems Administrator. If you are unable to perform any of the items
listed in this section, you will need to contact your Systems Administrator to
obtain those privileges.
Once a KeyRing is created, it is
issued and managed via the KeyRing Manager located in the Lockshop Section of
your links. Users are not required to possess other Lockshop or Issue
privileges to use or manage KeyRings. A KeyRing is then treated
similarly to any other key, except that the keys have been grouped together in
one issue entity, and is only dealt with in the KeyRing section of the program.
Creating a KeyRing
Start by clicking on the KeyRing
link in the main menu bar of your SpectrumNET software. This will bring you to a menu page
for KEYRING SELECT. We will discuss the other options from this page later
in this section. For now, we are going to create NEW KeyRing by clicking
on
Create link in the KeyRings found menu bar.
The
following screen will appear.

Enter a
unique KeyRing Tag identifier. We have chosen PP1 as our unique
identifier. Now click on the "CREATE" button.
NOTE:
Additional identifiers can be added to the actual ring identifier or stamped
identifier (PP1 - Physical Plant Emergency).
The program
will automatically issue the ring to the person creating the KeyRing, starting
your chain of custody history.
To add a
Key, enter the KeyID/Blindcode and Issue number stamped on the key to be added
to the ring.
Now, click
the "ADD" button.
Your key
has now been assigned to the PP1 KeyRing.
Repeat the
process to add additional keys. As you add keys to a KeyRing they will be
displayed in the inventory for that KeyRing.
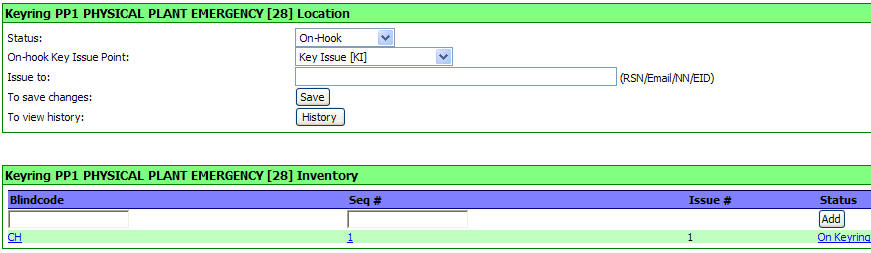
Placing the KeyRing at an Issue
Point
To place a
KeyRing at an Issue Point for Issue click on the "drop-down arrow" for the
STATUS of the KeyRing.
Click on the "On-Hook" option.

and then click on the "SAVE"
button.
Destroying a KeyRing
To
Destroy a KeyRing, click on the "drop-down arrow" for the
STATUS of the KeyRing.
Click on the "Destroyed" option.
Click on the "SAVE" button.
[See
example used in "Placing the KeyRing at an Issue Point", illustration above.
Marking a
KeyRing as Lost
To
Mark a KeyRing as Lost, click on the "drop-down arrow" for the
STATUS of the KeyRing.
Click on the "Lost" option.
Click on the "SAVE" button.
[See
example used in "Placing the KeyRing at an Issue Point", illustration above.
Marking a
KeyRing as Stolen
To
Mark a KeyRing as Stolen, click on the "drop-down arrow" for the
STATUS of the KeyRing.
Click on the "Stolen" option.
Click on the "SAVE" button.
[See
example used in "Placing the KeyRing at an Issue Point", illustration above.
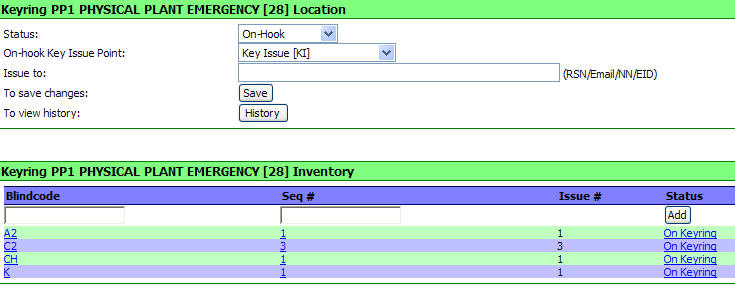
Re-Configuring or Modifying a
KeyRing
KeyRings may be
reconfigured or modified to meet your needs. Start by clicking on the
KeyRing link located in the sub-menu of the main KeyNET selection of your browser.
Click on the
"KeyRing" you want to re-configure or modify from the list of KeyRings
(we have selected the PP1 KeyRing).
The
following screen will appear:
You may add Keys to the ring as
described in Creating a KeyRing.
You may
remove keys from the ring by clicking on the "Status" of the key to be removed
from the ring.
In this example we
have selected the CH key by clicking on the "On Keyring" status.
The following
screen will appear.
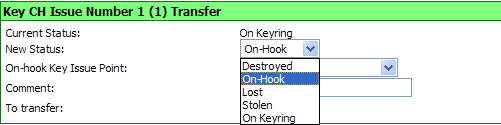
Remove the Key from the ring,
and place it back on the hook at key issue by
selecting the "drop-down arrow" for the On-Hook Key Issue Point (or
other key mark...lost, stolen or destroyed)
Click the "SAVE" button.
KeyRing Report
The current
Location of your KeyRings may be viewed at anytime. Start by clicking on
the KeyRing link listed in sub-menu of the main KeyNET selection of your browser.
KeyNET will provide you with a current list of all your KeyRings and the
location of each (in this case all of the KeyRings are "On Hook", and available
for issue).

In this case...the
PP1 ring has been issued to Don Johnson, and the CUST002 key is issued to
Trevor; while all other KeyRings are on the hook.

The KeyRing Management user may also
view all of the Deleted KeyRings by clicking on the "View Destroyed" link
in the KeyRing menu list.

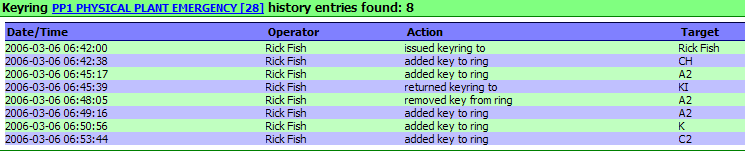
KeyRing History
The history of
each KeyRing may be displayed, printed or exported to suit your needs.
Start by
clicking on the KeyRing link listed in main menu bar.
Then
click on the KeyRing link located in the sub-menu bar.
Click on the
KeyRing for which you want a history.
Click on the
"History" button.
The history for
the selected KeyRing will be displayed.
About KeyRings and
their use
There are currently 3 deployment variations on KeyRings, the
Standard (the type typically deployed in the ULTRA deployment), the Electronic
Key Cabinet, and the WorkNET interface. Other variations can be developed.
Standard - designed for short term issue and return.
Typically this is the most common way of using KeyRings, where the KeyRings are
issued at the beginning of a shift and returned at the end of the shift; which
the dispatcher or supervisor providing oversight and verification of each
KeyRing, so the status always current. Because of the short term issuance
the KeyRing it is not issued via KeyIssue, but is handled separately in the
KeyRing area of the program. Long term issuing of keys should be made on
an individual basis in the KeyIssue section of the program.
Electronic Key Cabinet - this optional deployment allows KeyRings
to be issued to hooks in an electronic key cabinet. The tracking and
management of issuing those KeyRings is recorded in the electronic key cabinet.
Periodic and/or Auto-Auditing of the electronic key cabinet or cabinets into the
KeyNET program is also available by option. Video recording of all
transactions is now available by option.
WorkNET Interface - designed to have KeyRings issued and returned
in order to complete a WorkRequest, Service Ticket, or Routine Preventive
Maintenance. Currently, only available with WorkNET, this feature
displays which KeyRing or KeyRings are required to perform the work indicated on
the form. The WorkRequest of other such item cannot be closed out without
the issuance and return of said KeyRing(s). The KeyRing(s) is issued to
the WorkRequest, Service Ticket or RPM item, which is linked to the person
assigned the work through WorkNET>
|