|

Before starting, insure that your Systems Administrator has CONFIGURED your
privileges to allow you all of the features you will need from the Key Issue
Module.
Key Issue is where all of your work comes together and becomes
functional. Basically, you are taking information from the People
section of the program, and assigning them Keys (or other objects) from
other aspects of the program, or associated modules. First we will explain the
issuing of KEYS. Later in this manual we will discuss other aspects of
the program which are associated through the issue process to develop a more
robust program.
It is important to remember that you should have your MKI
(Multiple Key Issue) location programmed into your "My Preferences" before
attempting to issue keys, or other accountable items.
 marks the PEOPLE section of the Program. Once people are in your database, you can
assign Keys to them.
marks the PEOPLE section of the Program. Once people are in your database, you can
assign Keys to them.
 is the LOCKSHOP section of the Program. Once a key is in your database,
assigned a hook at an Issue Location; and Keys have been cut, identified, and
placed on the issue hook, you can assign them to People.
is the LOCKSHOP section of the Program. Once a key is in your database,
assigned a hook at an Issue Location; and Keys have been cut, identified, and
placed on the issue hook, you can assign them to People.
In
this section...
Start the Issue Process
Checking
Authorization Prior to key to be issued
Print an individuals record
Return a Key
Return a Key that
is RECALLED
Mark a key as
Stolen
Mark a key as
Lost
Mark a key as
FOUND.
Get a History
of keys issue to a person.
Finding WHO a key
belongs too
Ordering Keys Remotely
NEW
FEATURE -
Personnel changing departments
Issuing a Key:
Start by SEARCHING for the individual to whom you would like to issue a key, or keys.
This is done by clicking on the SEARCH link in the PEOPLE section in the left
column menu. We recommend starting with the first few letters of the
individuals last name (search may be done by any of the categories listed), and
clicking the ENTER button on your keyboard; or scroll down to the SEARCH button
near the bottom of the screen. We are using the name JOHN ABLE as the person
receiving a key to the Academic 1 Building, Room 403.
So I have entered the letters AB in the Last Name field and click on
 button. A list of names will appear that
match the criteria you entered. button. A list of names will appear that
match the criteria you entered.

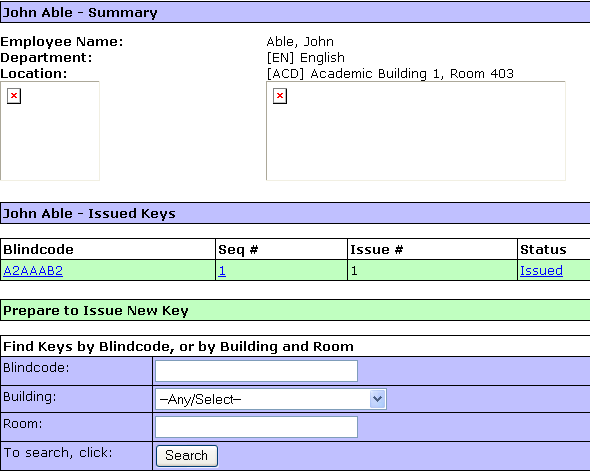
Select the individual to whom you are going to issue keys by clicking on the
last name. In this case the last of four listed. The record for that
individual will appear.

Next, you should click on the Key Issue link in the menu group directly below
the selected individuals name. This will produce the actual issue record for
the individual you have selected.
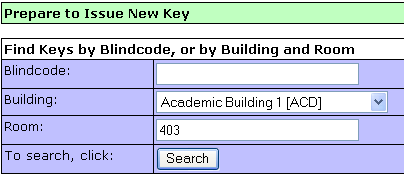
Next, you should enter the Building and Room to which the individual is to be
issued a key and click search. An alternative method is to enter the Key ID
(or blindcode) for the key to be issued. This method is not recommended because
you may be issuing an inappropriate key. However, it is a alternative provided
to aid in difficult searches.
In this case we are searching for a key to this persons office which is in
ACD 403. We enter the building from the drop-down menu, click the [Tab]
key, and enter 403 into the room field...now click on the [Search] Button.
The individuals record will regenerate and list the results of the search:
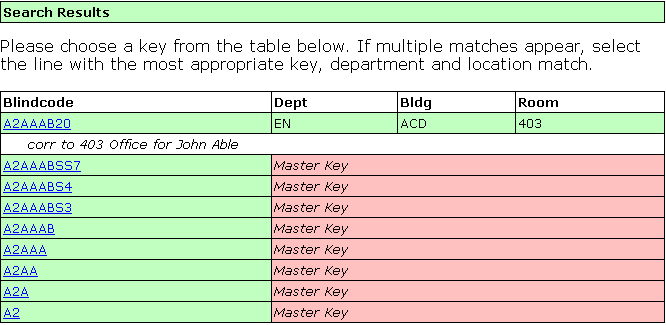
Notice that the exact mach for room ACD1 403 is displayed at the Top of the list.
All masters that will also operate the door are listed. Click on the key for
the room to issue the key, and the program automatically takes you to the
Authorization for the issue, in this case...
If you are using eKeyRequest you will bypass the following screen and go to a
screen described in the
eKeyRequest portion of this manual.
Authorizing the Issue: If you are NOT
using eKeyRequest, the following Authorization instruction will appear.
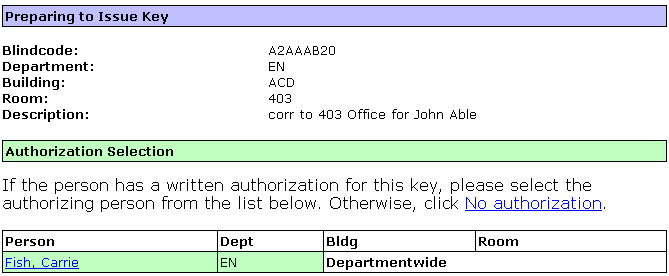
In this case, we will assume that we are not using eKeyRequest, but we are
enforcing Authorizations. If your Authorizing person does not match the
Authorization person, you should NOT issue the key. As there is only one person
authorized to allow access to this space, your authorization should match "Fish,
Carrie". Click on "Fish, Carrie" and the authorization will be associated with
this issue, and the following information will appear.
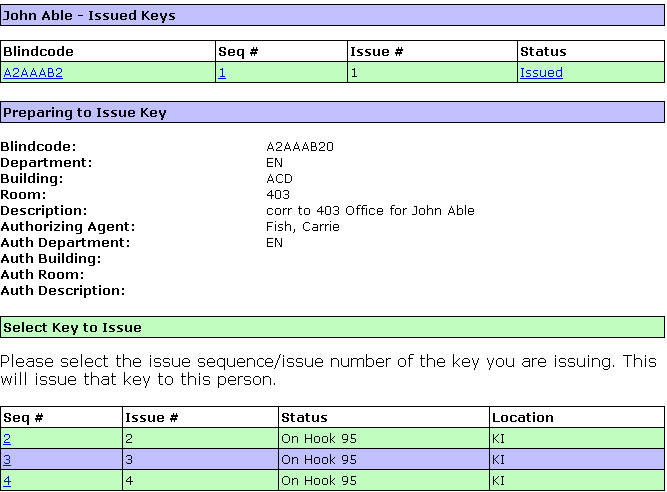
There are three keys available, each key on the hook will be identified with
the KeyID and the Issue# stamped on the key. Lets say that the #4 key is
the first key you grab from the hook, click on the #4 in the Seq# column.
Congratulations...you have issued the key, and this is what appears on his
record.
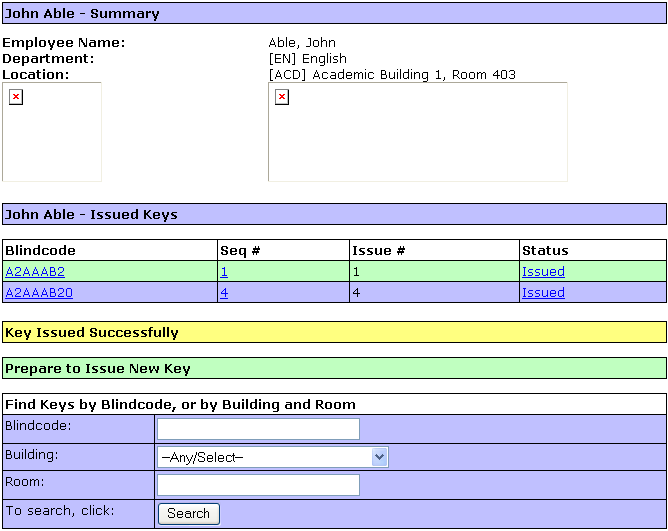
You are now ready to issue him another key, or have him sign for the keys in
his possession.
If you have purchased and are using eSignature you should now go to the
eSignature portion of
this manual. If not, proceed to the Printing of the Issue Record.
PRINTING THE ISSUE RECORD:
Printing the record for the individual to sign or as a copy is easy. Just
click on the "Print Letter" in the left hand column under OPTIONS.
In our test case the following information would appear:

This record is current to the time the Print Letter link is selected.
Simply print the letter for signature or copy by using your browser to print.
- Printed copies are not necessary in a paperless operation.
- Single sheet copies can be made for systems where the person issued
individual gets a copy.
- Single sheet copies can be made for systems where Key Issue keeps a
signed copy.
- Single sheet copies can be made for systems where central storage is
maintained.
- Multiple copies can be made for systems where multiple copies are
required
FINDING WHO A KEY BELONGS TOO:
If you have a key, and you want to know to whom the key
is issued, follow the following steps to obtain the information.
- Start by clicking on the Key Search link under the
Lockshop Group in the left hand column.
- Type in the Key ID into the Find Key by Blindcode
space, and click on the SEARCH BUTTON. DO NOT include the
ISSUE/Sequence number.
- Click on the correct Key ID from the list which is
displayed.
- Click on the Display Inventory link listed under the
Options Group in the left hand column of the page.
- A list of all keys using that KeyID will be
displayed.
- Select the one you are looking for from the list
being displayed.
ORDERING KEYS REMOTELY:
Ordering Keys remotely, or electronically, is performed through the eKeyOrder
procedure. There is a special section for this section,
click here, to access that information.
Return a Key
Keys may be
returned for a number of reasons, and there are a number of ways to return keys.
We will discuss some here. The first will be the most common, someone
returns the key to Key Issue. The second will be when a key is found, and
you want to return the key to Key Issue without reissuing the key.
-
Click on the
SEARCH link in the People Group located in the left hand column of your screen.
-
Type in the
first few letter of the person returning the key in the appropriate field
(first, last name or both) and click search.
-
Select the
person returning the key from the list and click on the name link.
-
Now click on
the KEY ISSUE link under the horizontal bar.
-
Click on the
STATUS of the key which is being returned.
-
The results is
defaulted to returning the key to the hook. Click on the SAVE button.
The key is now
removed from the persons issue list and is available for reissue.
In the second
case we will searching for who has a key which has been found, and returning it
to Key Issue, rather than returning it to the person to whom it was issued.
-
Click on the
Key Search link in the Lockshop Group located in the left hand column of your
screen.
-
Type in the
KeyID which is stamped on the key, less the issue number.
-
Click on the
Search Button.
-
Select the
KeyID from the displayed keys and click on the Blind code.
-
Now click on
the Display Inventory from the Options Group in the left-hand column.
-
You are now
viewing all of the keys which have been created for that Blind-code/KeyID.
Find the key you want to return, and click on the STATUS of that key.
-
The results is
defaulted to returning the key to the hook. Click on the SAVE button.
The key is now
removed from the persons issue list and is available for reissue.
Return a Key that is RECALLED
When returning a key that has been
identified as a recalled, the key can only be marked as destroyed. Keys
that are NOT recalled can be marked as Lost or Stolen or on the hook. Now,
when a recalled key is clicked on (to go to the status change screen for a key
return), a red banner advises the operator that the key is in recall and must be
destroyed upon return. "On Hook" is not offered, nor is a choice of key
issue point or other options typical to an active KeyID. Only "Destroyed"
is offered as an intake option.
Mark a key as
Stolen
Mark a key as
Lost
Mark a key as
FOUND.
Get a History
of keys issue to a person.
|