|

Key Operations
is the MAIN PAGE for
each KeyID used in your system. This page contains a snapshot of the
typical information required by a locksmith to perform his or her everyday
tasks, and links to supporting information.
Other aspects of the LOCKSHOP
module are listed and linked
in the column to the left.
From Key Operations a locksmith is able to view all of the
criteria which was used to establish the KeyID.
-
A listing of the criteria used
to establish the KeyID.
-
A table is provided which indicates the
proper pinning of cylinders (except for
cross-keying).
-
Keys directly above and below the selected KeyID are displayed
in an area indicated as "Masters", which follows the
hierarchy established for the key within the masterkey system.
-
Directly below the "Masters" table is the
"CORE LOCATIONS" section, which displays all of
the current core locations for the KeyID selected. You can have as many
core locations as needed to list all of the locations where the KeyID may be
used.
-
In the left hand links area, you will find a group listing for
HOOK ASSIGNMENTS. This space will
provide the hook location, issue point (if MKI is being used), and the number
of available keys at that hook location.
General Page This is a view of how the workspace will look for a KeyID
of A2AAAA1 in our test system.
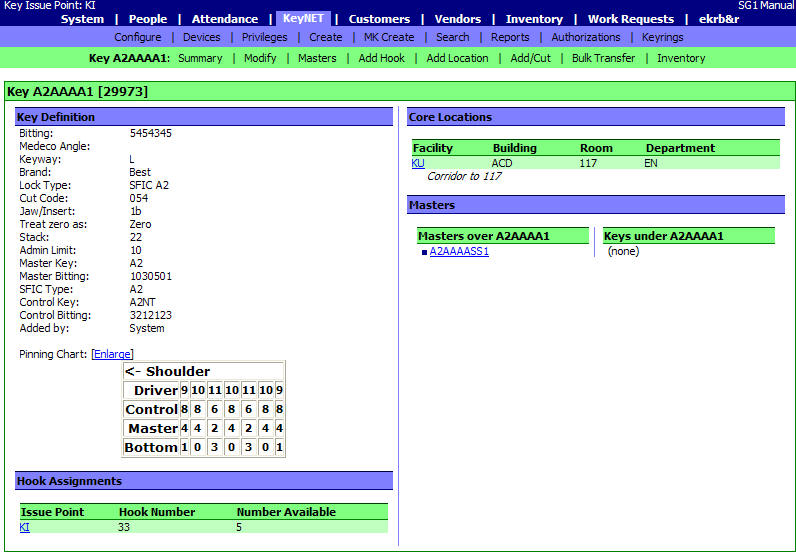
KeyID Criteria
When a KeyID is created in KeyNET, there
are certain criteria used to establish that KeyID. That criteria is
displayed for each KeyID used in your system. When you have searched for a
key and selected a specific KeyID that criteria is displayed in your workspace.
Notice, that the last item of the criteria is "Added By", which lets you know
WHO added the KeyID to the system. In our case, this KeyID was added by
using KeyNET to generate a masterkey system.
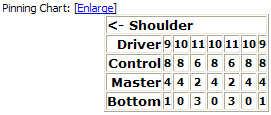
Pinning Chart
The pinning chart tells the locksmith how to pin a cylinder for
this KeyID. This chart will only contain cross-keying information if the
KeyID is listed separately as a cross-keyed KeyID. For information about
Cross-Keying, please refer to that section of the manual.
Masters

In this case, the KeyID A2AAAA1 is a Changekey; and there are no
keys under this key in the masterkey hierarchy. However, you will notice
that KeyID A2AAAASS1 is directly above the A2AAAA1 in the masterkey hierarchy.
If you click on the link A2AAAASS1, that KeyID will become the KeyID displayed
and will indicate the KeyID's above and below it. In this way you may
progress up and down the hierarchy of a masterkey system. This is true for
masterkey systems generated by KeyNET or if you have manually entered a systems
and linked the keys together.
Core Locations
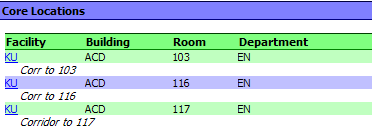
In this case, the KeyID A2AAAA1 is being used in three
locations. The Facility, Building, Room, Department and description of
each location is displayed. The information associated with each
core location can be accessed for editing purposes by simply clicking on the
facility link for the appropriate core location. This information is them
kept in a history file, so that you may assess changes which have been,
with regard to moving, storage or other core related changes.
Hook
Assignments

Hook assignments provides information about the number of keys available at
an issue point and where keys with a KeyID should reside when at the issue
point.
-
Some Facilities only have one Issue Point, their main key issue. In
which case the Issue Point would not be shown. this is also true of the
Issue Point in My Preferences. Issue Points are only relevant if you are
using the Multiple Key Issue (MKI) module of the program.
-
Facilities who are using MKI may create as many auxiliary Issue Points as
they have licensed. When additional Issue Points are created, a whole
new set of hooks are created for that site. Additionally, USERS can set
a default MKI location in their PREFERENCES, to default them to that site.
Locksmiths, who are the creators of the keys usually have access to all of the
Issue Points so they can assign the keys they have created to specific sites,
transfer keys between sights and generally manage the number of keys created.
How to ADD a Single Key
Keys may be added
to your system, linked within masterkey systems which have been imported or
manually created.
NOTE: If you have created a masterkey system
using a KeyNET masterkey generation system, keys CANNOT be added and/or linked
within the KeyNET generated system. KeyNET masterkey generated systems
create and identify all available KeyID's (blindcodes) within a system.
KeyNET generated systems only create complete systems, and there is no
expansion.
To enter a KeyID
(blindcode), start by clicking on the KeyNET link in the main menu bar at the
top of SpectrumNET web page.
NOTE: it is always best to check to see if there
are conflicts with the key you want to create before adding the key to the
system. This can be done by typing in the KeyID (blindcode), and searching
to see if that identification already exists. Conflicts with bittings or
keyways can also be avoided by checking for this type of information before
attempting to add a key.
Click on the
CREATE link in the sub-menu bar. The following screen will appear:

1.
Enter the new and unique KeyID (blindcode) into the space provided.
2.
Enter the bitting for the blindcode you are creating.
3. If
you have the Medeco module activated, enter the cut angles for each of the
bitting depths. If the key you are entering is not a Medeco key, leave
this field blank.
4.
Enter the Keyway that this Blindcode uses for key blanks and cylinders.
5.
Enter the Brand of lock that this Blindcode uses.
6.
Enter the lock type that this key will be used with (Systems managers can
add/delete/modify items in the drop down menu in System/Codes/KeyNET).
7.
Enter the Cut Code which you computerized key machine uses to properly cut the
blanks for this blindcode. [not required]
8.
Enter the Jaw or Insert which your computerized key machine uses to properly cut
this blindcode. [not required]
9.
Most locks treat zero as a zero, so that is the default. If the blindcode
treats zero as a ten (Sargent and some non-US locks) then you have to option of
changing zero to be treated as a ten. When this happens, the pinning chart
information is changed and the information sent to your computerized key machine
is changed, so that the proper pinning is displayed and the proper keys are cut.
10.
If your lock uses a stack when Masterkeying, you should enter that stack height.
[not required]
11. Set the Admin limit (the maximum number of keys to be added to the
KeyNET for this blindcode before KeyNET will stop allowing more keys to be added
(the maximum number of keys can be changed by using the "Modify" link in the
sub-menu bar. This unique feature helps your to control the number of keys
available.
12. Click the save button...and the key has been added to the system.
NOTE: The blindcode must be assigned a
"HOOK" before keys can be added to the system. Hooks are locations where
keys are stored for issue, or when being returned from issue.
NOTE: If you are
manually adding a key to an existing masterkey system,
or to a masterkey system that Spectrum Group has imported, please use the
following procedure:
1. Be sure you understand the hierarchy of the masterkey system you
are working with. An AA4 key is not normally under an AA3 key; but
is usually a change key under the AA masterkey, or under the AAS1 sub-masterkey.
2. Form the blindcode you want to associate with a masterkey system,
click on the "MASTERS" link in the sub-menu bar displaying your blindcode.

3. Enter the Master that is directly above your key in the
hierarchy. In this case it is the AAS1 submaster key...and click add.
The AA4 key now shows that the AAS1 key is the master directly over the AA4
blindcode in the masterkey hierarchy.

SPECIAL NOTE when working with Masterkey
Systems: The above example demonstrates the adding of a single key or
a change key to your system. If you are adding a key that is a sub-sub
master, submaster, master, grand master, great grand master or above...make sure
that you add the links for the key above, and the keys below in the hierarchy.
|